LED strip lights have become incredibly popular for adding accent lighting, under-cabinet illumination, and creating unique ambiance in homes and businesses. One of their biggest advantages is flexibility – these strips can be bent, curved, and even cut to fit specific spaces. But can you really cut LED strip lights without ruining them? The short answer is yes, but there are some important things to know first.
What Are LED Strip Lights?
Before we dive into cutting them, let’s quickly go over what LED strip lights are. These lighting solutions consist of multiple light-emitting diodes (LEDs) mounted on a flexible circuit board. The entire strip is encased in a protective cover, often with an adhesive backing to allow for easy installation.
Some key benefits of LED strips include:
- Energy efficiency: LEDs use far less electricity than incandescent bulbs
- Long lifespan: Quality LED strips can last 50,000 hours or more
- Versatility: Available in various colors, temperatures, and cutting options
- Low heat output: Stay cool to the touch, reducing fire risks
LED strips are commonly used for accent/task lighting under cabinets, along baseboards, behind TVs, in vehicle interiors, and many other creative applications.
Can You Really Cut LED Strip Lights?

The short answer is yes, you can cut most LED strip lights. Manufacturers design their strips with cutting points specifically for this purpose. It’s crucial to cut at the designated sections to avoid damaging the light strip.
Most quality strips will have marked cut line indicators – either small scissors icons or a row of circular copper pads between each LED cluster. These show exactly where you can make a clean cut without disrupting the electrical connections.
If you cut an LED strip anywhere besides these designated points, you risk severing the conductors and rendering at least part of the strip inoperable.
Read More Post : Do LED Lights Get Hot? You Might Be Surprised by the Answer
How to Properly Cut LED Strip Lights
Cutting LED strips is relatively easy as long as you follow the proper steps:
Step 1: Measure and Plan Your Desired Length Careful planning is key to avoid wasting strips by cutting too short. Measure the area where the LED lighting will be installed and determine the exact length you’ll need, factoring in any corner turns.
Step 2: Locate the Cut Line or Copper Dot Markings
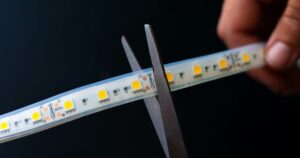
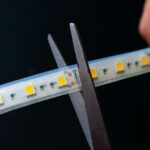
Carefully examine your LED strip and find the cutting point indicators – either small scissors icons or rows of circular copper pads between LED clusters.
Step 3: Use Sharp Scissors for a Clean, Straight Cut Using a fresh pair of sharp scissors, cut straight across the strip at one of the designated cut line markings. Don’t cut at an angle, as this can damage conductors.
Step 4: Double Check Polarity Before Connecting If reconnecting multiple cut sections, ensure the polarity is correct by matching the +/- markings or colored wires on both ends before connecting them.
One mistake to avoid – never cut LED strips while they are connected to power. This could short-circuit the strip and even pose a potential shock hazard. Always disconnect the power source first.
Reconnecting Cut LED Strip Lights

In many cases, you may want to reconnect sections of your LED strip lights after cutting them to fit a space. This is possible, but requires separate 4-pin connectors or similar linking hardware from the manufacturer.
The process is:
- Purchase connectors compatible with your strip width (e.g. 8mm, 10mm, etc.)
- Use snippers to expose 1/2″ of the copper conductors on strip ends
- Insert exposed conductors into connector, matching polarity markings
- Close/secure connector covers to protect the connection point
It’s important to use the correct connectors and ensure polarity is properly matched. An improper connection could prevent the rejoined strips from lighting consistently.
Some tips:
- Order extra connectors as they are easy to misplace
- For corners, use L-shaped connectors to create 90° turns
- Dot or label strip ends to identify polarity before re-connecting
- Consider soldering wires for a more permanent ultra-reliable connection
Tips for Installing Cut LED Strips
Once your LED strips are cut to length (and optionally reconnected using compatible connectors), you’re ready for installation:
Clean the Surface Thoroughly LED strips rely on a strong adhesive backing to stay mounted. Any dirt, grease, or moisture can prevent proper adhesion. Use isopropyl alcohol to clean the mounting surface.
Peel and Stick Firmly Peel away the adhesive backing one section at a time, sticking it down firmly while applying pressure to prevent air bubbles or gaps.
Hide Strips for Best Effects For a seamless built-in look, install strips behind ledges, under cabinets, or along corners where just the light will show, not the strips themselves.
Follow Corners and Obstacles Plan ahead for turns or areas the strips need to illuminate. Connector wires and L-connectors make it easy to navigate corners or go around obstacles.
Connect for Consistent Brightness If joining multiple cut strips together, ensure each section is properly connected to the low voltage power supply using correct polarity.
Dimming and Color Control For dimmable, color-changing RGB strips, you’ll need to connect the controller to adjust brightness, color temperature or cycling patterns.
When Should You Not Cut LED Strips?

While cutting is generally safe on quality LED strip lights, there are a few instances when you may want to avoid cutting:
- No Cut Line Markings Present – If the strip lacks any indicators, it may not be designed for cutting
- For Very Short Lengths (<12 inches) – Extremely short strip sections can experience power issues
- Cheaper, Low-Quality Strips – Budget strips may not reconnect reliably after being cut
If you’re unsure whether your LED strip lights can be safely cut, refer to the manufacturer’s instructions or contact their customer service.
FAQs
Can LED light strips be removed?
Yes, LED light strips can be removed easily without causing damage.
Can you cut and join LED strip lights?
LED strip lights can be cut and joined according to desired lengths and configurations.
Do LED strip lights still work when cut?
LED strip lights continue to function even after being cut, as long as the remaining segments are connected properly.
Conclusion
LED strip lights provide a world of creative lighting possibilities for homes and businesses. One of their best features is the ability to cut and reconnect strips to fit unique spaces using the proper cutting and connection techniques:
Key Takeaways:
- Cut only at designated markings to avoid damage
- Disconnect power before cutting
- Use compatible connectors to rejoin cut sections
- Match polarity (+/-) on all connections
- Install firmly on a clean, prepped surface
- Hide strips whenever possible for seamless lighting
With a little planning and care, cutting LED strip lights expands the possibilities for under-cabinet task lighting, accent lighting, bias lighting, and many other custom lighting setups. So get creative and let your LED lighting shine!